TIN ID Philippines (2025): How to Apply Online, Verify & Get Digital or Physical TIN ID:
A Taxpayer Identification Number (TIN) ID is a government-issued identification card in the Philippines that verifies your TIN, which is assigned by the Bureau of Internal Revenue (BIR).
This guide covers how to get a TIN ID in 2025 through both online and manual methods. Whether you’re a student, unemployed, first-time job seeker, employee, or freelancer, you’ll find step-by-step instructions based on your situation. It also explains how to apply if you already have a TIN and just need the ID.
In addition, you will learn how to verify your TIN number online, recover a forgotten TIN, and replace a lost or damaged TIN ID. This article also answers the most common questions about the TIN ID to help you avoid mistakes and complete the process smoothly.
What is a TIN ID in Philippines?
The TIN ID is an essential document for individuals and businesses in the Philippines, particularly for tax filings, identification, and financial transactions. It is issued by the Bureau of Internal Revenue(BIR).
It is a unique TIN assigned by the BIR to individuals and businesses for tax purposes. You will need it to start a new job, open a bank account, or register for a company.
How to Get a TIN ID in the Philippines?
Getting a TIN ID in the Philippines is a straightforward process, especially for first-time applicants. You can get online or through a personal visit to your concerned BIR office, or also through a representative.
We will discuss all methods with relevant screenshots and visuals, so that you understand the process easily. Besides, there is a difference in the registration form and requirements depending on the type of applicants. We will discuss the application process for different applicants separately.
How to Get a TIN/Online Registration?
Suppose you are a student, unemployed, or a first-time job seeker, and you don’t have a tax identification number(TIN). In that case, you can get it online through the online registration process at the ORUS BRI eServices official portal.
The process includes two steps: first, obtaining a Tax Identification Number (TIN), and then obtaining a TIN digital ID once the TIN is secured.
You will need the following documents to get a TIN:
- Any government-issued ID.
- Selfie of yourself holding the government-issued ID.
- Marriage contract, if you are married.
If you want to process the application through a representative, you will also need the following documents:
- Special Power of Attorney.
- A valid ID of the authorized representative.
Now, let’s understand the online step-by-step application process for the TIN:
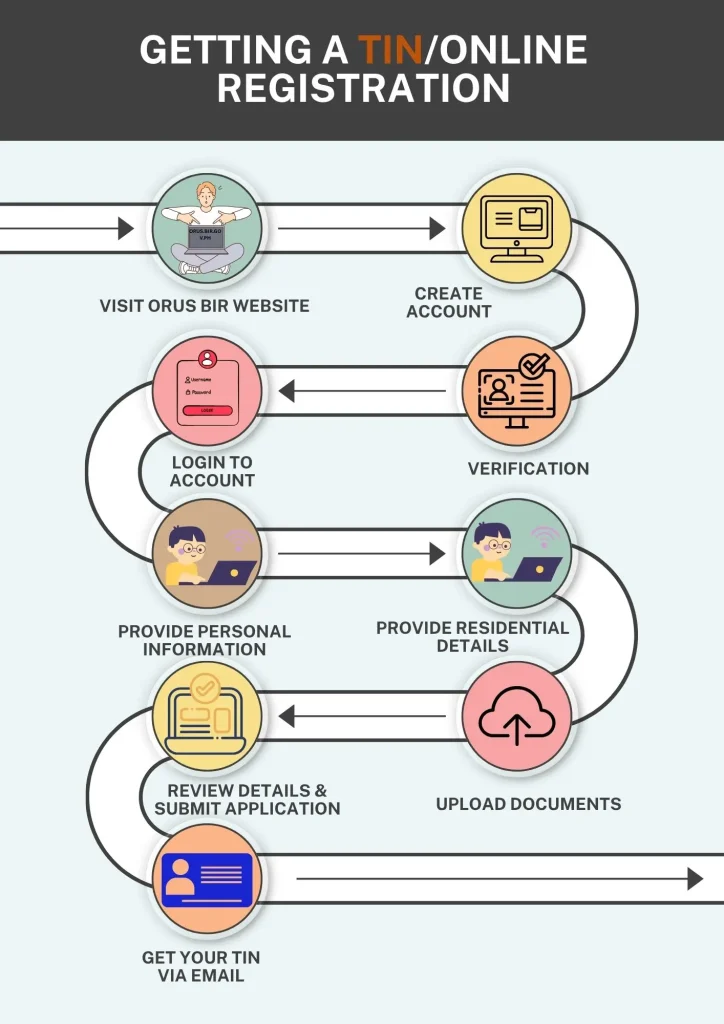
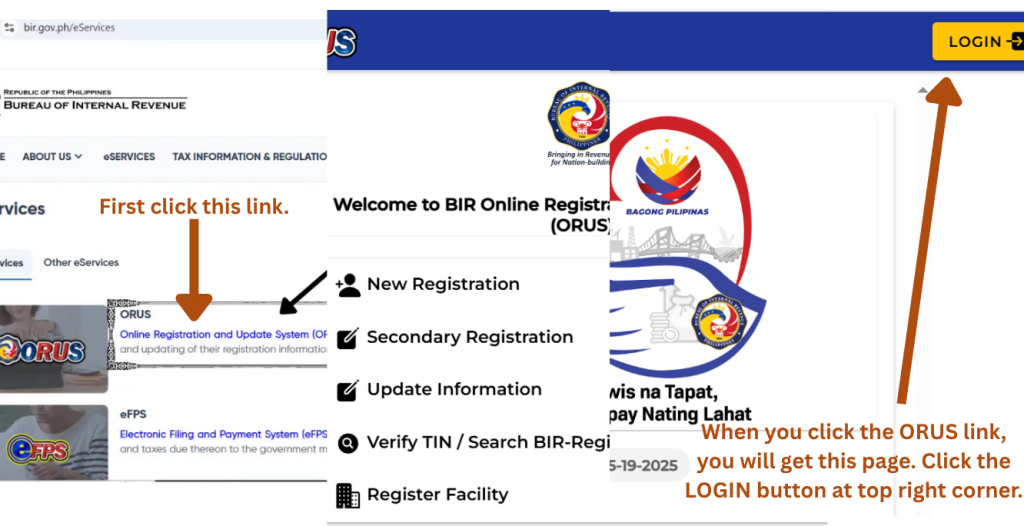
Step 1. 🌐Go to the ORUS BIR official website:
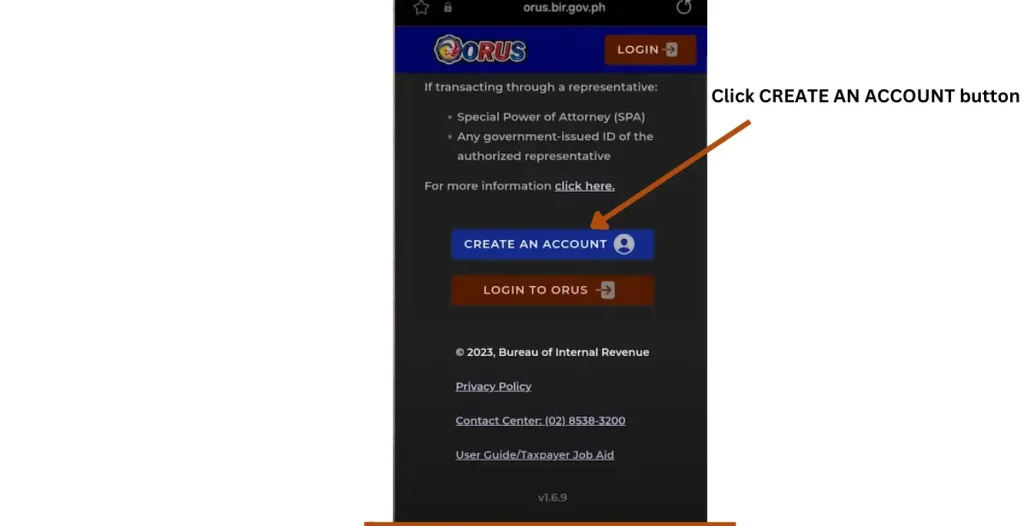
Go to the official site, https://orus.bir.gov.ph/, or type it in your browser(orus bir gov ph eServices). You can do this with your phone having an internet connection. The home page below will appear on the screen.
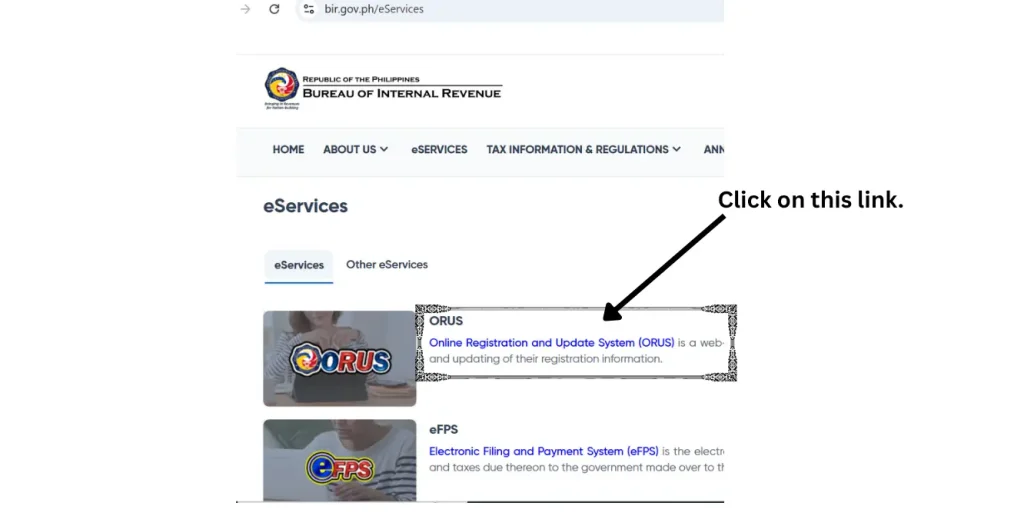
The applicants need to click the Online Registration and Update System (ORUS), to access the online registration form for the TIN.

Step 2. 📝Create BIR ORUS Account Online:
Click the New Registration option. You will get the two options: As a Non-Individual, and As an Individual.
Click the As an Individual option, and scroll down the screen. Find the CREATE AN ACCOUNT button, and click it.
Click the CREATE AN ACCOUNT button. You will get the terms and conditions page. Scroll down to reach the portion below on this page.

Tick the box, and then click the AGREE button. You will get to the page below.

Choose the Taxpayer option and then the option to process the online registration process for the TIN as a fresh applicant.
When you choose these options, an ATTENTION pop-up page will appear as shown below.

Click the I AGREE button. You will return to the registration page. Our concern is with selecting the User Type—Transaction option.
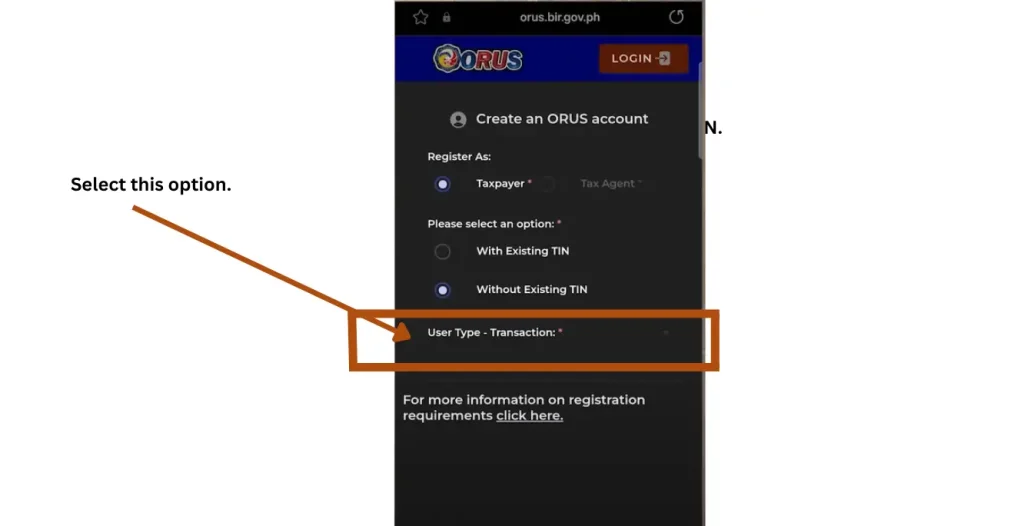
Click the User Type—Transaction option, and you will get the options as present in the following image.
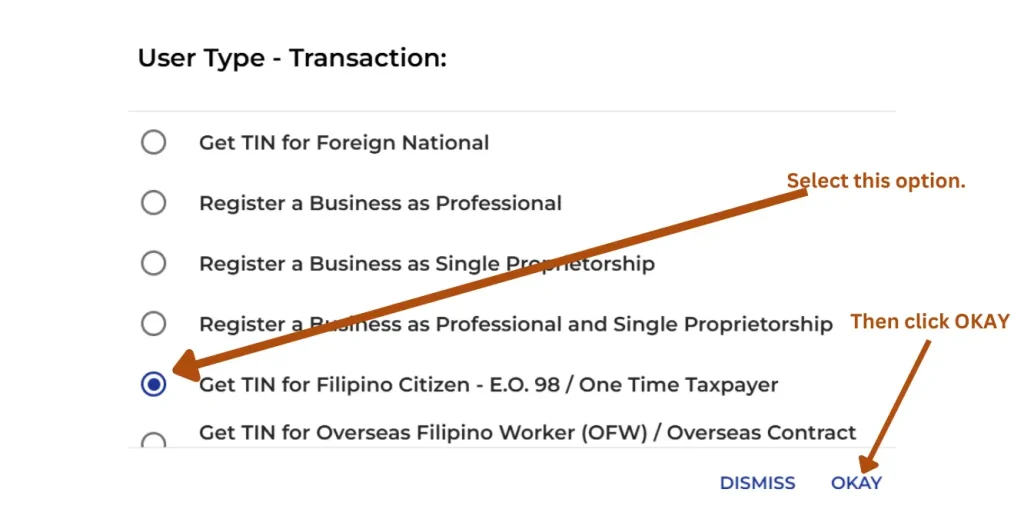
Select the Get TIN for Filipino Citizen – E.O. 98 / One Time Taxpayer option. This option is for the following type of applicants:
- If you are a student.
- You are unemployed.
- You are a first-time job seeker, but have not gotten hired yet.
Select it, and then click OKAY.
Now, you have to select the taxpayer type: One Time Transaction(ONETFC) or Executive Order No. 98 – Filipino Citizen (EO98FC).
One Time Transaction(ONETFC): If you need it for one transaction only, like buying land, a car, etc. Your only concern is a single transaction.
Executive Order No. 98 – Filipino Citizen (EO98FC): TIN needed for government services (passport, PhilHealth, SSS, etc.) even if not earning yet. This is the best option for students, the unemployed, and first-time job seekers.
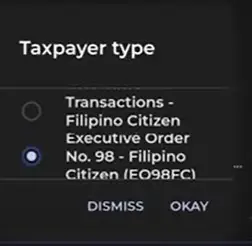
Click OKAY after selecting the Executive Order No. 98 – (EO98FC).
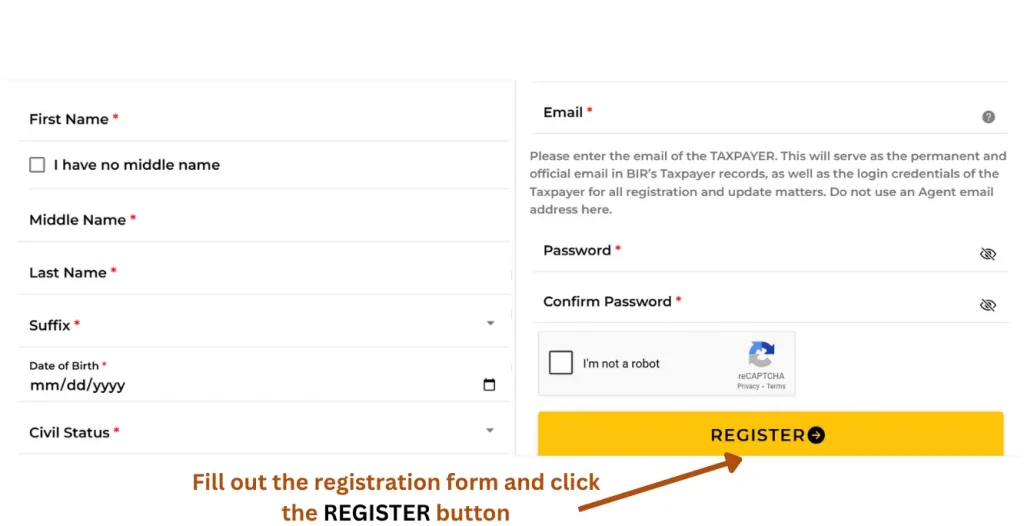
Fill out the registration form by providing the details below:
- Your name: First, middle, and last name. (In case of no middle name, click the box I have no middle name).
- Suffix
- Date of Birth
- Civil Status
- Gender
- Email(It should be a valid email. It will be your permanent and official email in the BIR’s taxpayer records and will be used for login to the BIR website for updating your information).
- Complete the captcha challenge.
- Review your details and then click the REGISTER button.
Step 3. 🛡️Completion of the Online Verification:
Now, go to your provided email, and look for the verification message in your inbox or spam folder. Open the message. There will be a verification link in the message. Click that link to complete the verification process.
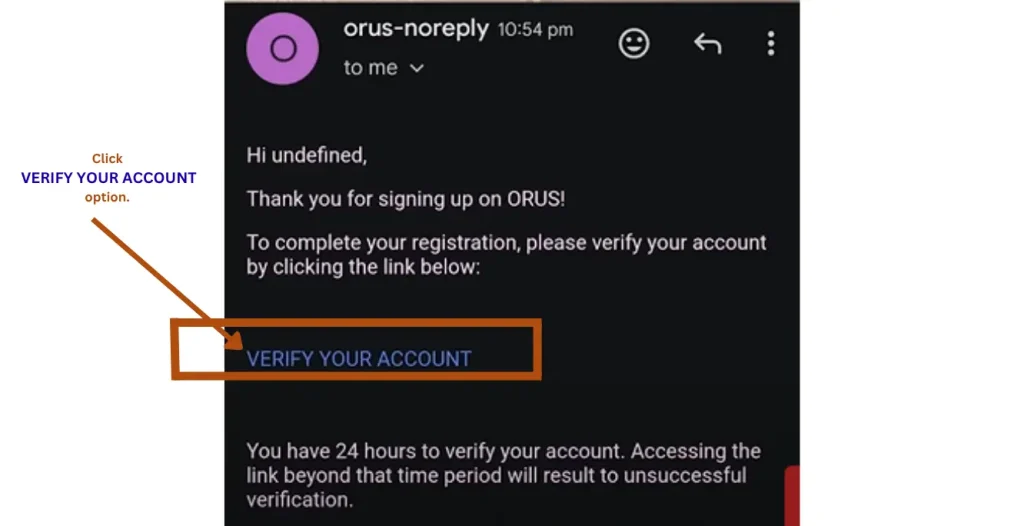
Click the VERIFY YOUR ACCOUNT text. A pop-up message will appear on the screen, which will be about the registration of your account. It will contain a CONGRATULATIONS message. Click OK, and your account is successfully registered with the BIR portal.
Step 4. 🔐Log in to Your Profile:
Now, you can log in to your account. Go to the BIR website, bir.gov.ph.
Click on the ORUS icon or the link near to it. Or go to orus.bir.gov.ph.
Click the LOGIN button.

Provide your registered email, password, and click the captcha challenge box, and finally click the LOGIN button. You will get the page below on the screen.
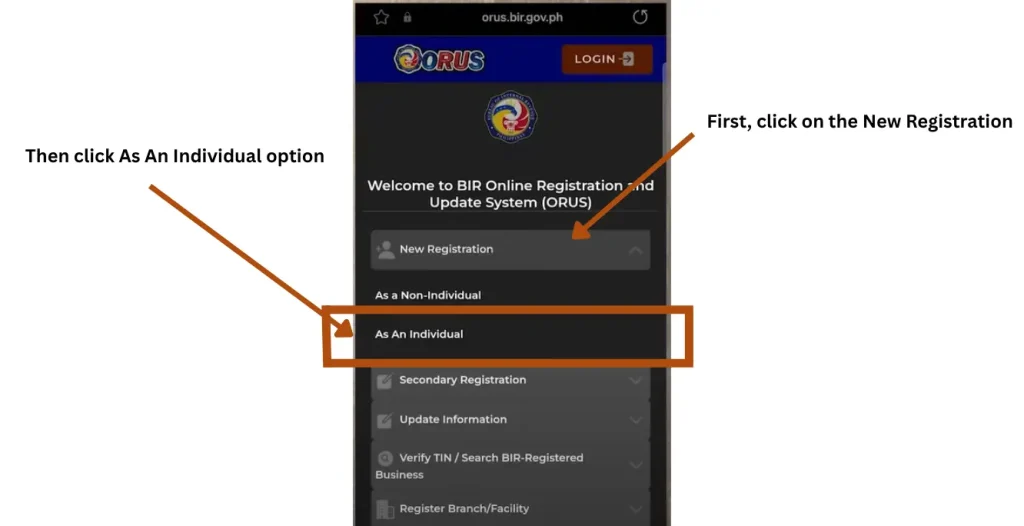
First, click the New Registration option, and then click the As an Individual option. Scroll down the screen to get the portion below the page.
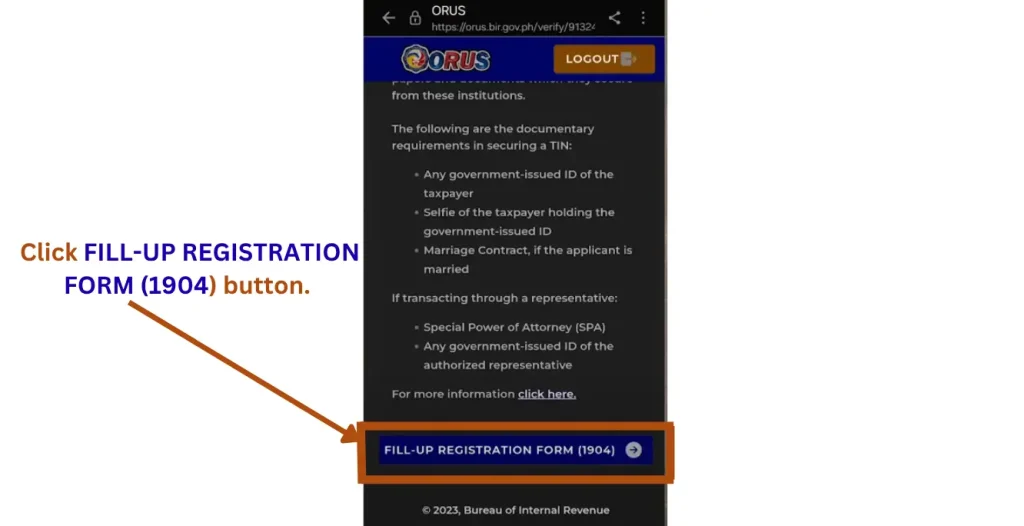
Click the FILL-UP REGISTRATION FORM (1904) button.
Step 5. Fill up the Taxpayer Information Sections of the Registration Form(1904):
Fill out all the sections of information.
Fill out all the sections. To sum up, you will need to provide the following information:
- Philsys Card Number(PCN): Provide the 16-digit number on the front of your Philsys ID, also known as the Philippines National ID.
- First, middle, and last name. (If already mentioned, then don’t need to write again.)
- Date of birth.
- Place of birth.
- Civil status
- Gender
- Mother’s maiden name
- Father’s name.
- Contact number.
- Gmail(it is the registered email).
Provide all the details, and finally click the CONTINUE button.
Step 6. 🏠Fill out the Residence Address Sections of the Registration Form (1904):
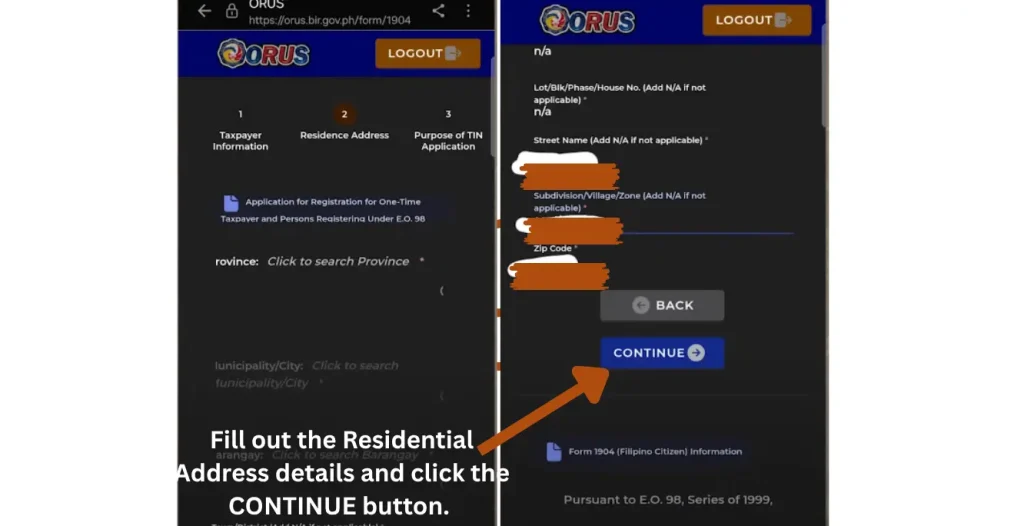
Residential Address Information: Search and select your residential address in the following order:
- Province
- Municipality/city
- Barangay
- Building name/Tower
- Lot/phase/house No.
- Street name
- Village/zone
- Zip code
Provide all the details. In case of no information for a specific section, simply write n/a in that section. Finally, click the CONTINUE button.
Another page will appear on the screen. It will ask you if you want your application to be processed through a representative, YES/NO?
Click YES if you are going to process your application through a representative, otherwise click NO.
If you are married, you will need to provide your spouse’s information in the next step. Provide information to the relevant sections if you are married.
In the next step, you need to upload documents. The documents should be in PNG, JPEG, or PDF format, and the size of the file should be less than 25 MB.
Step 7. Upload the Required Files for the Registration Form (1904):
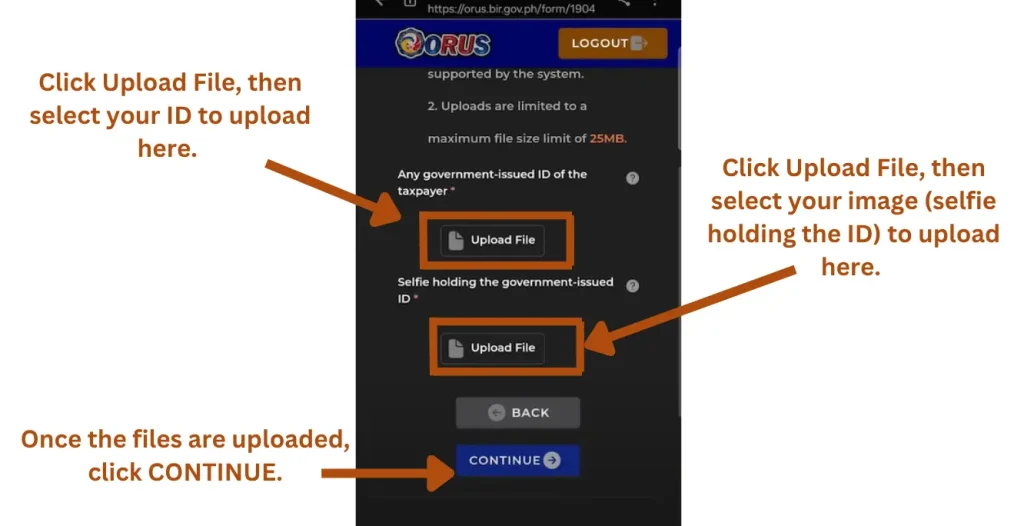
Click on the Upload File option, and upload a valid government-issued ID of yourself. Then hold that ID and take a selfie of yourself. Upload that file too. Once successfully uploaded, click the CONTINUE button.
Step 8: Review Details and Submit Application:
All the information you have provided during the online application process will be displayed on the screen. Review all the details.
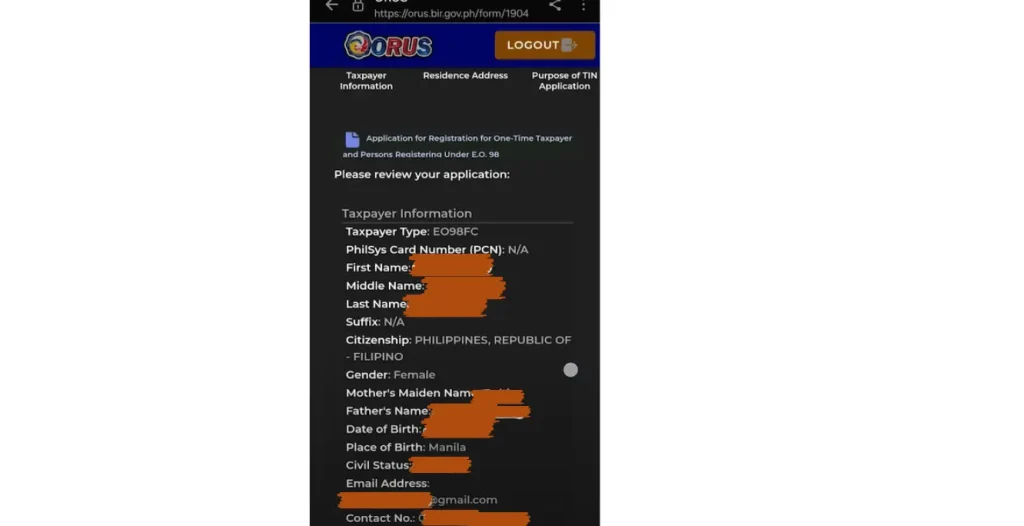
Make sure all the provided information is correct. Scroll down the page, tick the boxes.
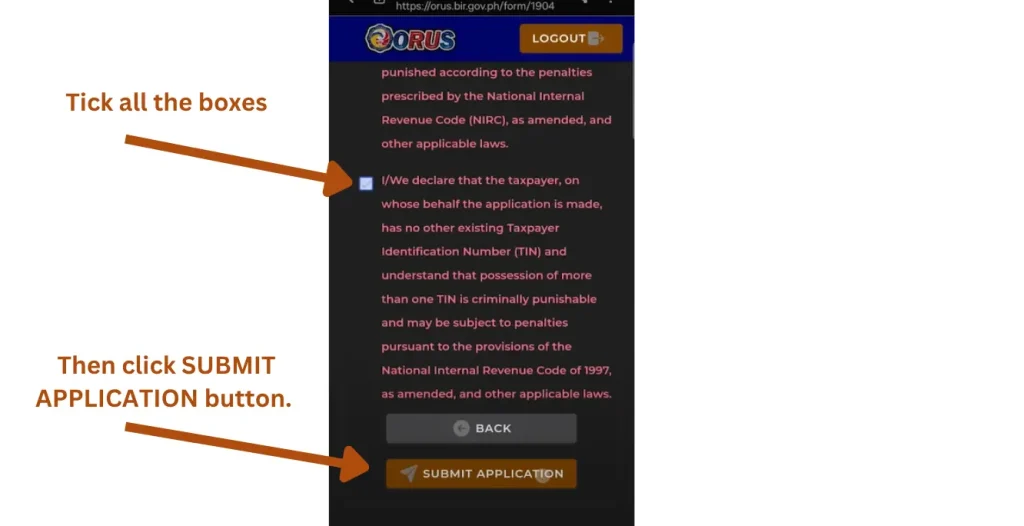
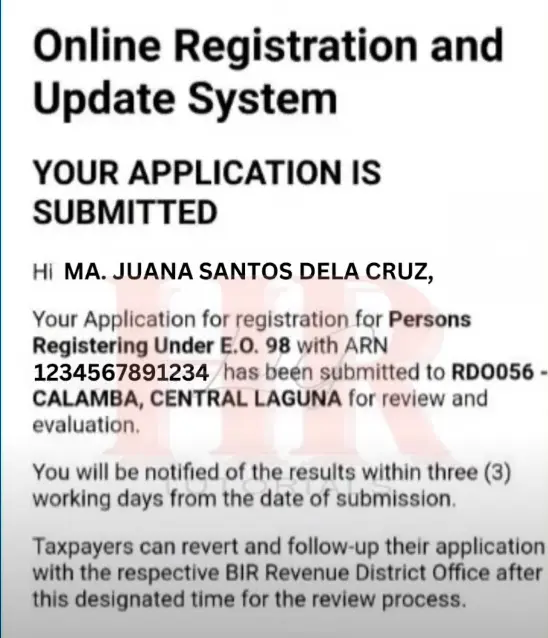
Tick all the boxes, and finally click the SUBMIT APPLICATION button. Your application is successfully submitted for the TIN.
A pop-up window will display on the screen. It will include information that your application has been submitted for review and approval. An email will also be sent to your email. You can go to your email and see the details of your application.
Step 9. Getting Your TIN:
It will take up to three working days to get an approval/rejection message from the BIR. If your application is approved, you will get the following email.
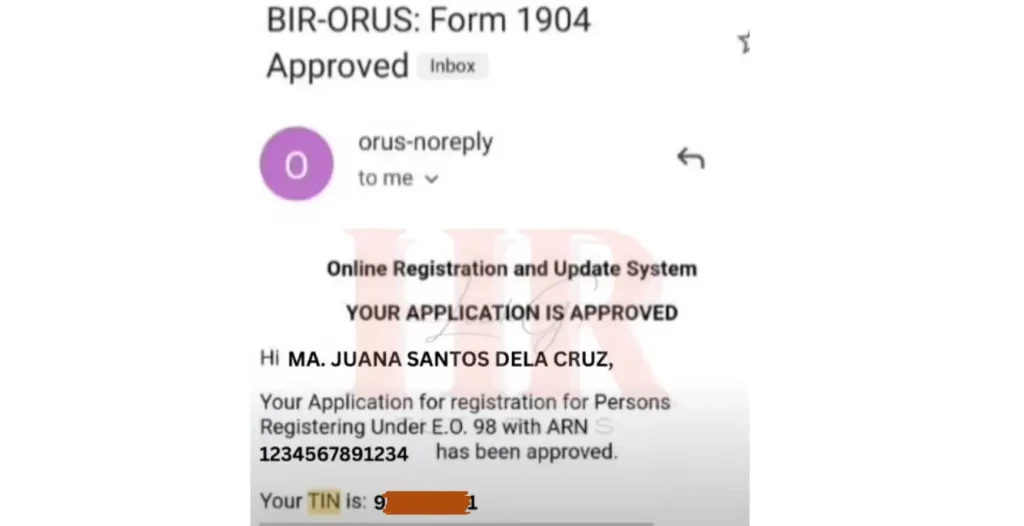
It will also contain your unique TIN. This is how you can get the Tax Identification Number.
How to Get the Digital TIN ID online?
Once you get the TIN, you can get the digital TIN ID online from the comfort of your home. Here is the stepwise process:

Step 1. Go to ORUS BIR eServices Official Portal:
Click the following link, orus.bir.gov.ph, to access the ORUS BIR eServices portal. You can also just write words like orus bir eServices gov Ph to access the official site.
When you get to the right page directly, click on the LOGIN button. However, if you get to the left page, click on the link Online Registration and Update System (ORUS). You will get the right page. Click on the LOGIN button of this page to access your account.
Click on the LOGIN button present at the top right corner of the ORUS home page.
Step 2. Log in to Your ORUS BIR Account:
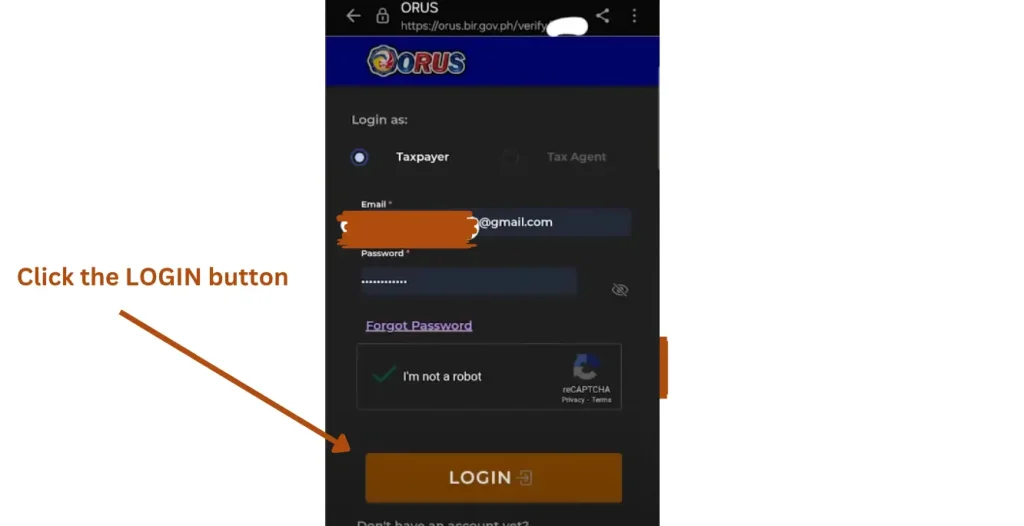
Provide your registered email and password to log in to your account.
Step 3. Search and Select Get Your Digital TIN ID Option:
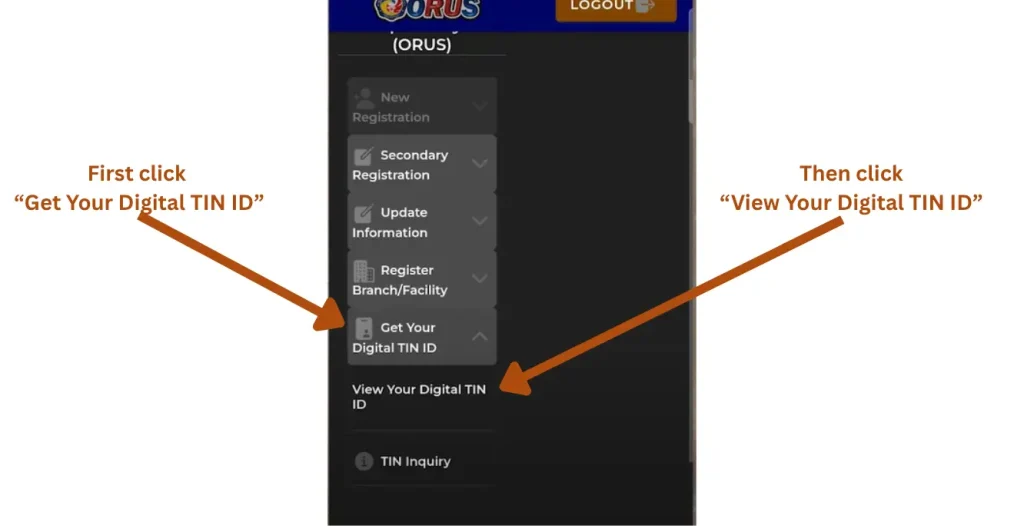
When you LOGIN to your profile, you will get this page. Find and click Get Your Digital TIN ID option. Then click on View Your Digital TIN ID.
Scroll down the screen and find the below portion of the page.
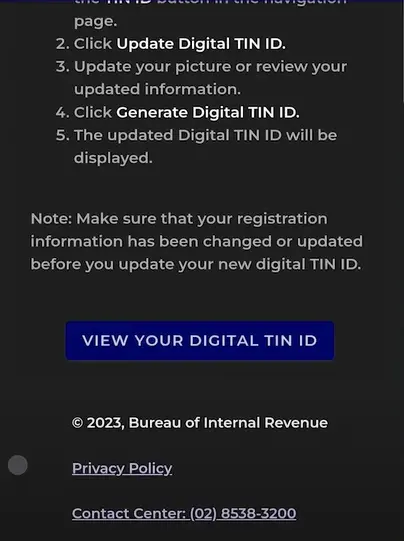
Click on VIEW YOUR DIGITAL TIN ID.
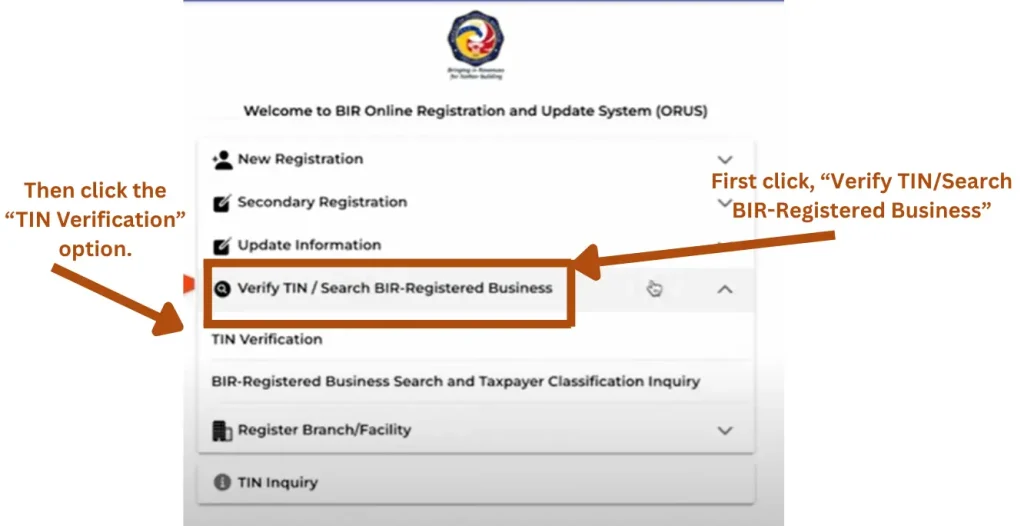
Your digital TIN ID will be displayed on the screen with front and back views.
Step 4. Upload Your Photo to the Digital TIN ID:
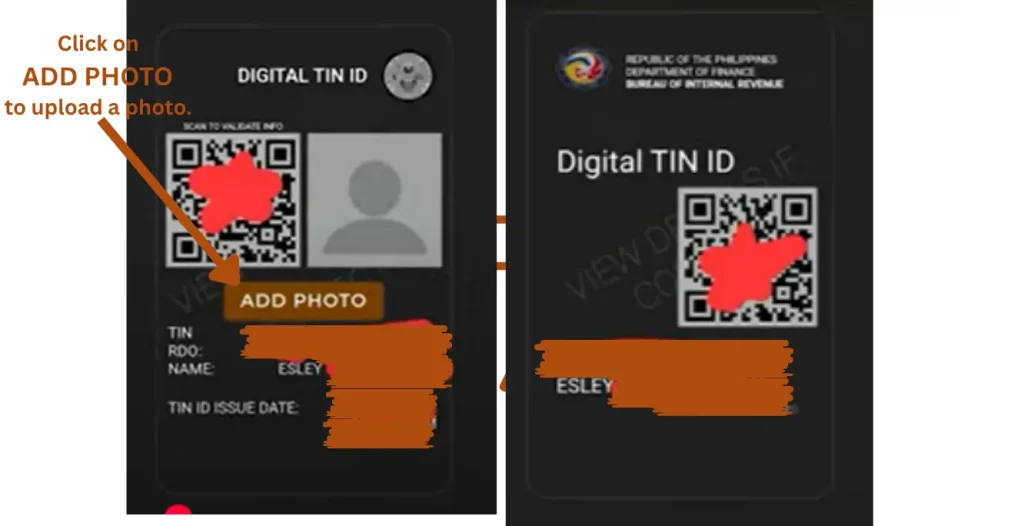
Click on ADD PHOTO. Upload a photo of yourself in JPEG/JPG or PNG format of size less than 10 MB. The dimension of the image should be 1*1 with a white background. It should be a recent, normal-looking face picture without glasses or a smiley face.
When you click, ADD PHOTO, a general page will appear with PROCEED button. Click on the PROCEED button.
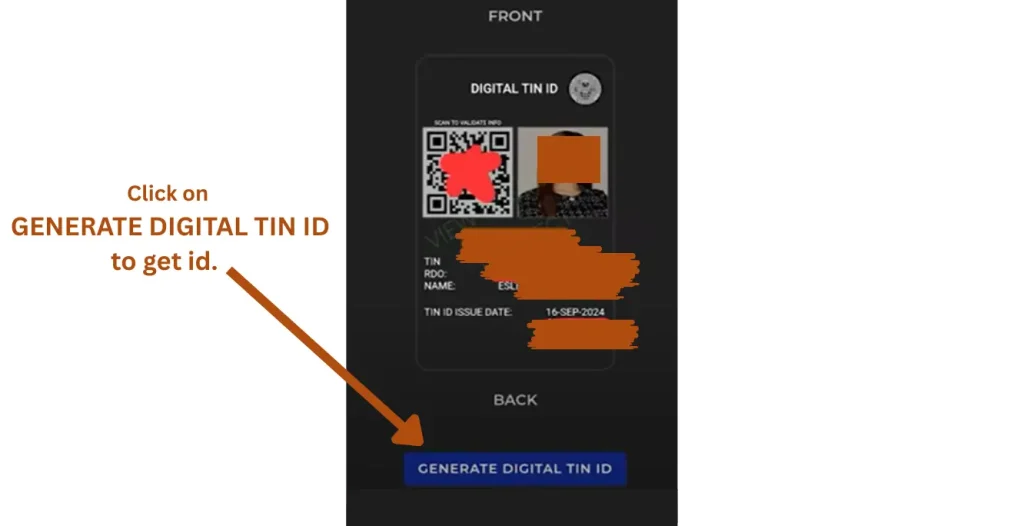
After uploading the image, click on the GENERATE DIGITAL TIN ID button.
After clicking the GENERATE DIGITAL TIN ID button, a page will appear on the screen. Tick the box in the page and then click the CONFIRM button.
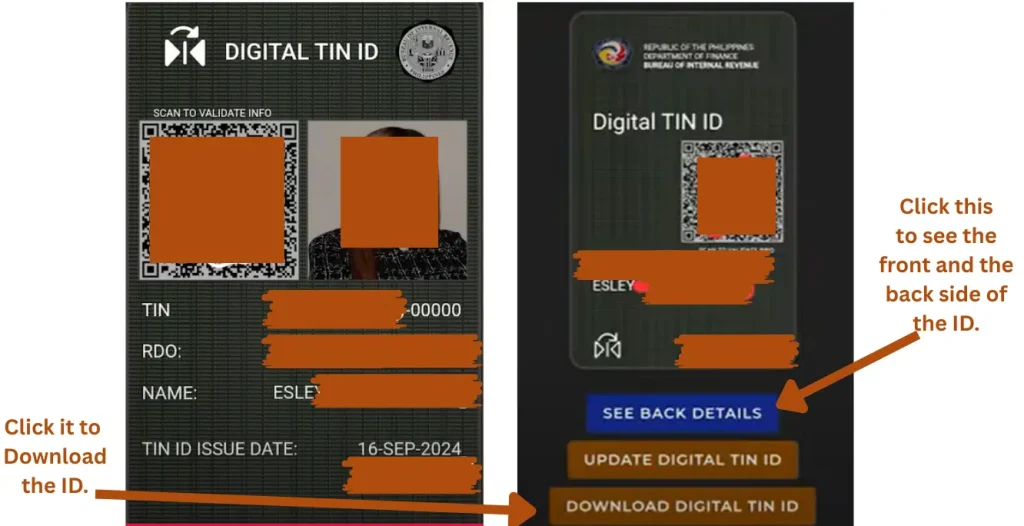
Step 5. Download Your Digital TIN ID:
Your digital TIN ID will be displayed. Now, you can see the front side and the back side of the ID and also you can download your digital TIN ID card.
This is how you can complete the application process for getting the digital TIN ID.
Now, you can view the front and back details of your ID. You can also download the digital ID card.
How to Get a Digital TIN ID Online If You Already Have a TIN?
If you already have a TIN but were registered manually (e.g., through your employer or get it form your BIR RDO office) and you want the digital TIN ID card, you need to complete two important steps first:
- First, you need to create your account online with the ORUS BIR website.
- Secondly, you need to apply for the TIN ID online through the ORUS BRI portal.
Lets discuss the process:
- Go to orus.bir.gov.ph, and go for the New Registration.
- Choose Individual option, and click on the CREATE AN ACCOUNT button.
- Choose Register as Taxpayer* and For “Please select an option*, click With Existing TIN option”. (important step for this application process).
- Provide the required details, and click the Register button.
- Verify your account by clicking the verification link in your registered email.
- Log in to your account.
- Login to your account, and fill out the registration form.
- Provide the required details and also upload the required documents.
- You will get the TIN within 3 days. It will be the same as you already have.
We’ve already covered this process in detail, but if you’re applying for a Digital TIN ID, make sure to select the “With Existing TIN” option. For a complete step-by-step guide with screenshots, check out our detailed tutorial here 👉 How to Get TIN / Online Registration (Step-by-Step Guide)
- Now login again to your account and apply for the digital TIN ID.
- Click the Get Your Digital TIN ID option, and then click View TIN ID.
- Click on View Your Digital TIN ID, and upload your photo.
- Finally click on GENERATE TIN ID, and your digital TIN ID will be generated. You can view the front, and the back side of the card, and also you can download it.
We have already covered this topic with screenshots in a separate topic for your convenience. Click here: How to Get a Digital TIN ID Online?
How to Get a TIN ID as an Employee:
An Employee needs a TIN for the following purposes:
- For tax compliance.
- It is a job requirement. Most companies don’t proceed unless you provide them with a TIN.
- You will need it for opening a salary account or applying for a loan.
Let’s discuss how to get it:
Step 1: Know Your Eligibility:
You can get a TIN on your own by applying online on the BIR online portal before getting a job. However, if you get a job, and you don’t have it. The employer will process the application for you.
Employers usually assist new hires in getting a TIN as part of their onboarding process because they need it for payroll and BIR compliance.
Applying yourself is simple and free. You can do it online via BIR’s eReg system or by visiting your concerned BIR RDO (Revenue District Office) before getting the job. We have discussed the online registration process above in this article.
Step 2. Required Documents:
Collect all your required documents. Provide all the required documents to the employer,/they will process the application for you.
Step 3. Visit Your Concerned RDO Office or the nearest RDO Office:
The employer will visit your concerned office or the RDO office near the employer’s company. Your employer will get the TIN application form 1902 from the office, or you can also download it online.
Step 4. Submit the Application Form along with the Required Documents:
They will submit your complete application form along with the required documents.
Step 5. Collect your ID:
Your application and the other documents will be verified in the office. Once successfully verified, they will provide a TIN and TIN ID on the same day.
However, it is also possible that they provide only the TIN and request you to visit on another appointment day to claim your TIN ID.
Once you have the TIN, you can also get the digital TIN ID online. Visit the orus bir eServices portal. Click the ORUS icon or the related link near it. Perform the online registration process to make an account on the site, and then log in to your account to secure the digital TIN ID.
Note: If you want to know how to secure a digital TIN ID and how to do the online registration process for it, go to the top of this article. We have explained the process and attached screenshots of every step for your convenience.
How can an unemployed Filipino or a Student get a TIN ID manually in the Philippines?
If you are an unemployed Filipino or a student, you can get a TIN ID in the Philippines. You may need it for the following purposes:
- Bank transaction: For opening bank accounts or making large deposits or withdrawals in banks.
- Government Services: To avail of services like subsidies.
- Future readiness: To avoid delays when employment or business opportunities arise.
Here is the stepwise process to apply manually for a TIN ID:
Step 1: Complete Your Required Documents:
Gather all the required documents before going to your concerned RDO office.
Step 2. Fill out the Application Form:
Download the application form online, BIR Form 1904, or get it from the office. Fill out the application form with your correct and updated personal details.
Step 3: Submit the Application Form along with the Required Documents:
Submit the application form 1904 along with the required documents and wait for the verification process.
Step 4. Claim Your TIN ID:
After successful verification, you will get your TIN ID.
In most cases, you will get the TIN 9-digit number and the ID on the same day. However, it is also possible that they provide the 9-digit TIN on the same day and request you to visit on another appointment day to get the TIN ID.
TIN ID Application Process for Self-Employed Individuals, Freelancers, and Mixed Income Earners:
As a self-employed individual or freelancer, or having mixed income sources, you will need to get the TIN for the following purposes:
- For business legitimacy.
- For filing taxes.
- For a loan application in case of financial support.
Step 1. Determine/Know your Eligibility:
For Self-employed/freelancers/mixed income earners: You can get it if you are 18 years old.
For Foreigners: If you are working or planning to do business in the Philippines, you are eligible to legalize your business and pay the taxes.
Step 2. Required Documents for the Registration of TIN:
You need the required documents to process the application. It includes the following list:
- A duly filled BIR registration form 1901:
Copy of a valid government-issued ID(like passport, UMID, Driver’s License, voter’s ID, Driving License, NBI clearance) - PSA-issued Birth Certificate
- Community tax certificate(cedula)
- Photo
- Marriage contract for married women
Step 3. Visit the Nearest BIR Office:
Visit your concerned Revenue District Office(RDO). If you don’t know about your concerned RDO office, you can check it online using the BIR website. Go to the BIR website and find the appropriate DRO office for your application process.
Get the registration form 1901 from the office. Fill out the form with your information completely. Submit the form along with the required documents at the prescribed counter.
They will check your application and the documents. You will be asked to wait until your document verification.
Step 4. Claim your TIN ID:
Once the verification process is completed, you can claim your ID.
Most of the RDOs issue the ID on the same day. However, you may also be asked to visit the office on a scheduled release date.
Visit the office on the scheduled date along with the required documents and a valid ID to claim your TIN ID.
How to Get a TIN ID Through a Representative?
If you’re unable to apply in person for the TIN ID in the Philippines, a representative can apply on your behalf. Make sure to provide:
- Authorization letter
- A photocopy of your valid ID
- Valid ID of your representative
- All required documents for the TIN ID application
Getting a TIN is a straightforward process. It is recommended to do it on your own. However, if you are abroad, disabled, or severely ill, and you need the TIN. You can process your application through a representative.
An authorization letter is a simple letter. You can download it online, write your own on a sample paper, or type it to take a printout of it.
Sign it and provide your valid ID and other required documents along with it. The authorized person will get a TIN ID for you.
Requirement Documents for TIN ID Application:
- BRI Registration Form.
- Form 1901 for Self-employed / Freelancers
- Form 1902 for Employed individuals
- Form 1903 for Corporations / Partnerships
- Form 1904 for Students, unemployed, one-time transaction taxpayers.
- One Valid Government-issued ID: It should be a Passport, a Driver’s License, a PhilSys ID, a UMID, etc.
The ID must fulfill the following requirements:
- It is a valid ID that is not expired.
- It should be an original ID, not a photocopied one.
- It should be in good condition. (Clearly show your name, picture, and other details.)
- ID Picture (1×1 or 2×2). Printed photos of your face. It should be recent with a white background. Most offices demand with white background, green is also accepted.
- PSA-issued birth certificate. If a valid D is not present, you may be asked for it. It is usually required of students, the unemployed, and first-time job seekers.
- Marriage Certificate. If you are updating your civil status with the BIR, or you are a woman and want to use your married name.
- Community Tax Certificate(Cedula). The BIR office may also ask for it as proof of your residence.
- SPA. An authorization letter if you are applying through a Representative. It should be signed by the applicant.
- Photocopy of the Applicant.
- A valid ID of the representative.
Where to Get the TIN ID:
You can get your TIN ID in Philippines at the Revenue District Office (RDO) of the Bureau of Internal Revenue (BIR) based on your address or your employer’s location.
You can also get it online through the BIR website. Now, you can apply online on ORUS BIR gov ph eServices, and get your TIN. Once you get the TIN, log in to your account and get your Digital TIN ID.
If you have the TIN and want to get the digital TIN ID, you can get the TIN ID online. Do the online registration process via the BIR eServices and complete your profile. Log in to your account and get the digital TIN ID.
Types of TINs (Taxpayer Identification Numbers) in the Philippines:
In the Philippines, each individual or business is assigned only one TIN for life. The BIR does not categorize TINs into types like ‘individual’ or ‘secondary.’ These classifications apply in other countries, such as the United States, but not in the Philippine tax system.
It is a 9-digit number unique for every individual or business. BIR assigns it to the following types of taxpayers:
- Employees working in the public or private sectors.
- Self-employed individuals like freelancers and professionals.
- Foreign nationals who are earning in the Philippines.
- Unemployed or students applying for government services.
- Business owners need to legalize their business and pay taxes.
Key Features of TIN ID:
Here are some of the key features of the TIN in the Philippines:
Full name: It accurately reflects your full legal name.
TIN: A unique 9-digit number assigned for a lifetime. Only one TIN per person is allowed by law.
Signature: May appears on the ID. You will be asked to do it during issuance.
Issuing BIR RDO: It indicates the BIR RDO office where it was issued.
Non-transferable and non-expiring: It is strictly personal and cannot be used by anyone.
Valid for lifetime use: It is issued for lifetime, unless there is a legal reason for changes or cancellation.
Unique for every applicant: It is unique for every applicant.
Valid ID: It is a valid government-issued ID.
Uses of TIN ID in the Philippines:
- Government transactions (e.g., SSS, PhilHealth, NBI)
- Bank account opening
- Job applications
- Loan applications
- Business permits and licensing
TIN ID Number:
Your TIN is a 9-digit number unique to you. This number is used for all tax-related activities.
It is issued by BIR. Individuals and businesses need it to file a tax return, statement, or other document with the BIR. This TIN 9-digits number must be included in tax-related activities to properly identify the taxpayer for tax purposes.
TIN Online Verification:
The BIR has an online system for the verification of the Taxpayers’ Identification Numbers(TINs) in the Philippines. The system required the following details from you to process the online verification process for you.
From Individual:
- Taxpayer’s TIN
- Full name
- Date of birth
- Suffix
- Gender
From non-individual:
- Taxpayer’s TIN
- Registered Name(Full name or registered corporate name)
Follow the steps below for the online verification of your TIN:
Visit the ORUS BIR website, orus bir gov ph.
Click the link next to the ORUS icon.
First, click the “Verify TIN/Search BIR-Registered Business”, and then click the TIN Verification option.
Click the PROCEED button. It will present at the right side of the screen if you are applying through a laptop or PC. However; if you are applying via using your mobile phone, scroll down the screen to the botton, you will find the PROCEED button. Click it.
The below page will appear. First, select the Individual option.
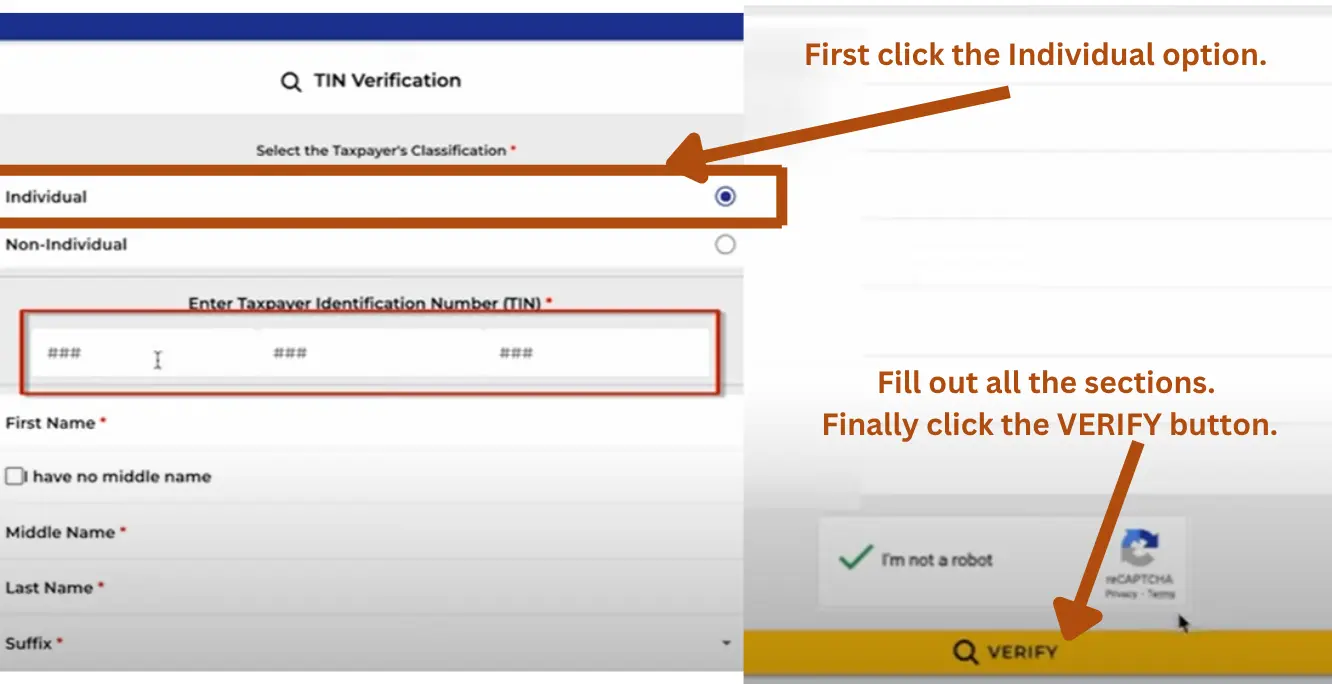
When you select the Individual option, the other details will be appeared on the screen. Fill out all the sections of the required data.
Complete the captcha challenge.
Finally, click the VERIFY button.
It will process your data and display the result for you.
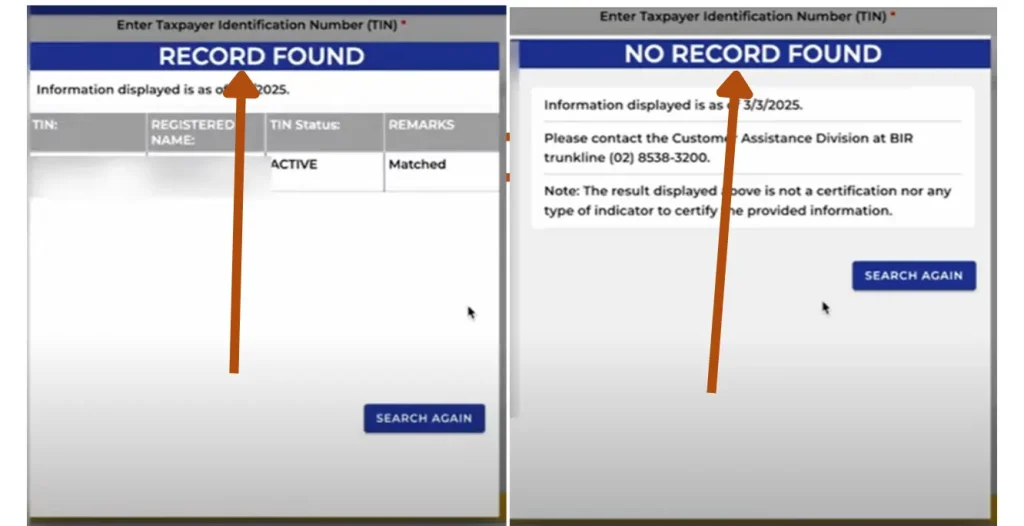
Here are the two expected results which you can expect during the online verification process for the Tax Identification Number.
If your record found with the BRI database, it will display the left side details of this image. It will also display you TIN, full name, TIN status(Active or not active), and remarks.
If your record not present with the BRI database, it will display not found record message as present in the right side of the image. You can try again or contact the BRI RDO office to solve this issue.
How to Recover a Forgotten TIN?
You can recover your forgotten TIN online through the ORUS BRI portal.
Go to the bir official website(bir.gov.ph).
Click the ORUS icon or the link near to it(orus.bir.gov.ph). You will get th ORUS BIR home page given below.
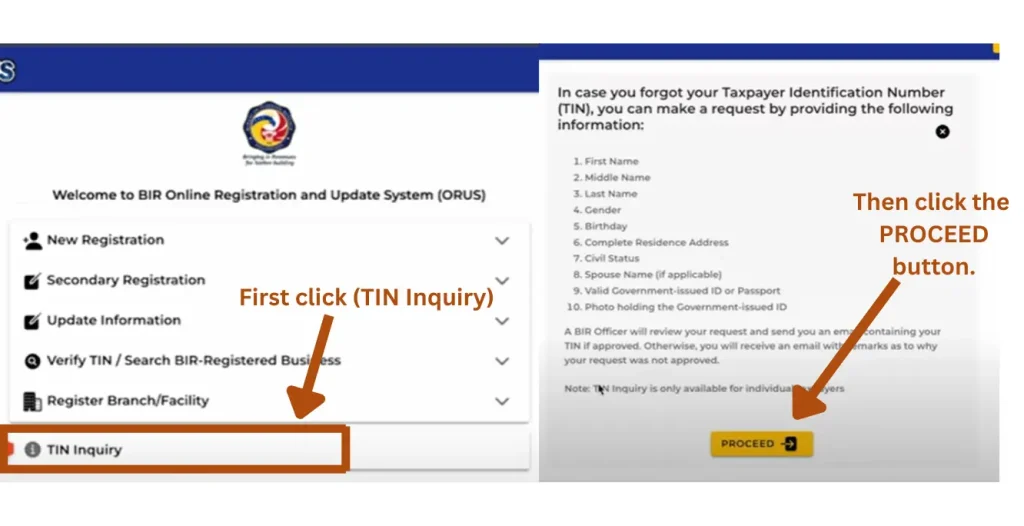
First click the TIN Inquiry option. A list of required documents along with a PROCEED button will be appeared .
Click the PROCEED button. You must have the required details to recover you tax identification number.
Provide your registered email address, tick mark the boxes, complete the captcha challenge, and finally click the CONFIRM button.
You will get an email. Go to your email. Find the BIR message in your inbox or spam folder. Open the message, and there will a link in that message. Copy that link and paste in seach bar.
When you paste the link in search bar, a page will open. Provide your details in that form like your name, gender, date of birth, etc. Click CONTINUE button.
Provide your residential details, and then click the CONTINUE button.
Upload your government-issued ID, and an image of yourself which will be a selfie holding the ID, and a marriage contract if you are married. Once uploaded, click the CONTINUE button.
All your provided details will be displayed on the screen. Review all the details, tick all the boxes, and finally click the SUBMIT APPLICATION button.
You will get an email that you have successfully submitted your application. The application processing time is 3 days. Within 3 days, you will be informed about your TIN.
This is how you can recover your TIN. The process is same like the online registration process once you get the email. For the complete guidelines with attached screenshots for every step, you can check and take help from that topic. The topic is present at the start of this article.
How to Replace a Lost or Damaged TIN ID?
If you lost your TIN ID or it is damaged, and you want a replacement, here is the step-by-step process.
First, prepare an affidavit if your card is lost or stolen. The affidavit should be submitted when applying for the replacement.
If it is damaged, you don’t need an affidavit. Simply apply for the new one, but you will provide the original old ID as a compulsory requirement.
Required Documents to get a New TIN ID for a Lost or Damaged TIN ID:
Collect and fill out the BIR Form 1905. Mention the reason as Lost or Damaged.
An affidavit of loss or the damaged TIN ID card.
Valid government-issued ID(original and photocopy)
BIR Form 0605(replacement fee payment form of ₱100).
Visit the RDO Office:
Go to the BIR RDO office, where your TIN is already registered. Request for a replacement/new TIN ID. Fill out the Form 1905, and pay the replacement processing fee of ₱100 to get the Form 0605. Submit the forms along with other required documents to the office.
Collection of the TIN ID:
Your application will be verified in the RDO office. Once the verification process is completed, you can collect your TIN ID.
They will issue you the ID on the same day. However, it is also possible that they recommend you visit another day and collect it, depending on the workload.
Cost of TIN ID (Physical and Digital):
The TIN ID in the Philippines is free of cost when issued for the first time. No payment is needed during the online or in-person application.
However, if your card is lost or damaged, the replacement fee is ₱100. The ₱100 applies when you request a new card due to loss or damage. You will pay it at the BIR RDO office during the replacement request.
If you’re registering a business with the BIR (not just applying for a personal TIN), you will need to pay ₱500 Annual Registration Fee (ARF), and ₱30 Documentary Stamp Tax (DST) on the Certificate of Registration. The total annual cost is ₱530 to complete the registration.
Summary:
| Application Type | Fee details | Total Fee |
| Business Registration (Form 1901/1903) | ₱500 ARF + ₱30 DST | ₱530 |
| Individual TIN (employees, OFWs, etc.) Lost/Damaged TIN ID (for individuals) | Free (₱0) Replacement card fee | ₱0 |
Green TIN ID:
The color of the TIN ID card, whether green or yellow, does not affect its validity or purpose. Cards issued before July 16, 2021, were yellow, while those released after that date adopted a green design as part of the BIR’s visual update.
Despite the change in appearance, both versions remain equally valid and serve the same function as official proof of your Taxpayer Identification Number. So, whether your card is yellow or green, it can still be used for all government and financial transactions where a TIN ID is required.
Role of TIN ID in Government Services:
The TIN ID in the Philipines plays an important role in various government services in the Philippines. It is often required when dealing with agencies such as the SSS, PhilHealth, PAG-IBIG, NBI, and DFA, particularly for identification, verification, and claiming benefits. It ensures that your tax records are properly linked across systems, promoting transparency and efficiency in government transactions.
Is a TIN ID a Valid ID?
Yes, the TIN ID is considered a valid government-issued ID in the Philippines. It serves as official proof of a person’s taxpayer registration.
While some institutions may prefer IDs with photos and signatures, most government agencies and financial institutions accept the TIN ID for various transactions, especially when it includes the cardholder’s photo and signature.
FAQs:
Conclusion:
Securing a TIN ID in the Philippines is a straightforward process, whether you’re an employee, self-employed, unemployed, a student, or a foreign national. It not only proves your registration with the BIR but also serves as a valid government-issued ID accepted across various sectors.
With the availability of both in-person and digital application options, the process is now more accessible than ever. Moreover, with the BIR’s continued digital transformation, online services such as digital TIN ID and TIN verification are gradually improving access and convenience for taxpayers.
By understanding the eligibility criteria, required documents, registration forms, and proper procedures, whether you’re applying for the first time or replacing a lost card, you can ensure a smooth and hassle-free experience. Remember, your TIN ID is for life, so take the time to get it right.